Logistics of travel – part 4: Tracking your bookings (& saving your sanity)

Ok, we’ve worked out where and when to go. We’ve worked out roughly how much it’s going to cost. And we’ve worked out a plan to save the funds. Now that’s all done, it’s time to get booking.

If you’re taking a trip like ours, there’s going to be a lot to book. Flights, trains, hire cars, hotels, Airbnbs, insurance and visas, tickets to sports games and museums and cooking classes… When you have 4 months worth of bookings, you want to be able to keep tabs on things quickly and easily. You don’t need fancy accounting programs or booking-tracker apps; you literally just need a simple spreadsheet.

This is basically how mine is set up, in a note on my trusty Evernote app:
TRANSPORT:
FLIGHT DETAILS BUDGET ACTUAL COST & DATE PAID BOOKED WITH BOOKING
NUMBER
NOTES
01 Jan: MEL – LAX $2400.00 $2285.00 paid via credit card 18.02.17 Qantas website 18.02.17 XXX88X Saved email in RTW folder
02 Jan: LAX – YYC $600.00 $629.00 paid via PayPal 24.02.17 American Airlines website 24.02.17 XX55XX
08 Jan: YYC – KTN $800.00 $784.00 paid via credit card 02.03.17 Alaska Airlines website 02.03.17 XXXX98
ACCOMMODATION:
HOTEL
DETAILS
BUDGET ACTUAL COST & DATE PAID BOOKED WITH BOOKING NUMBER NOTES
01 – 02 Jan: Los Angeles hotel $150.00 USD$85.00 to be paid on arrival Booking.com 05.03.17 ABCDEF Double room, non-smoking
02 – 08 Jan: Calgary hotel $800.00
08 – 12 Jan: Ketchikan hotel $500
OTHER:
DETAILS BUDGET ACTUAL COST & DATE PAID BOOKED WITH BOOKING
NUMBER
NOTES
Travel insurance $400.00
Canadian National Parks pass $150.00
Ketchikan city tour $50.00

And that’s about it. The way I use this is:

1. I started by filling in the first column of the travel plans that needed to be booked.

2. I filled in the second column with the amount we budgeted for each item.


Once we actually started getting things booked in:

3. I filled in the third column with the actual amount we ended up spending and the date it was paid

4. The fourth column was who I booked with, be in via email, website, third party, whatever, and the date they confirmed the booking.

5. In column five, I just put the booking confirmation number.

6. And the last column is just any notes.

IMG_9659
This has been SO much easier that trying to write down details, keep track of receipts, dealing with piles of paperwork I’ve printed. Because pretty much everything is done online these days, I’ve been able to have all confirmations and payment receipts emailed to me, and if I need to find them, I just need to copy and paste the reservation number from that spreadsheet into my email search function. It has also been a great tool for keeping on top of how closely we’ve been sticking to our budget – realising how far under we actually were, we even decided to splurge on a gorgeous 4 star beach-side resort in Koh Samui for the end of our trip instead of our usual 2-star standard!
Advertisement

Logistics of travel – part 3: How to create your savings budget

Now that you know how much money you’re going to actually need for your trip, creating a savings budget is pretty simple (actually sticking to it may be another story…).

STEP ONE
Take your summary from STEP EIGHT when you did your spendings budget back out again:
TRANSPORT: $4,600
ACCOMMODATION: $2,850
SPENDING: $2,400
INSURANCE: $400
COSTS AT HOME: $1,700
TOTAL FOR TRIP: $11,950
STEP TWO
Work out what cash flow you already have going towards your trip. For example, you may have already started saving a bit, you may be entitled to some holiday pay while you’re away, or maybe you know that you’re going to be getting a half decent tax return.
NEED: $11,950
MINUS:
Annual leave pay $2,000
Already saved $1,500
Tax return $500 (approx)
TOTAL: $4,000
STEP THREE
Easy maths: how much do you need between now and when you want to start your trip?
Currently: January 2017
Travel starts: January 2018
Need: $7,950
STEP FOUR
Break it down to less scary numbers:
1. Need $330 per person, per month for 12 months
2. We both get paid fortnightly, so we each need to put away $165 per pay
And that’s pretty much all there is to this part! Like I said, once you know roughly how much you’re expecting to spend on your trip, it’s super easy to work out what to save. Sticking to the budget can be hard, but one of the best things I’ve ever done was to open a separate travel bank account. Now, every pay day, whatever I need for my next trip goes straight into that separate account, not to be touched until I start booking and paying for it.

Logistics of travel – part 2: How to create your spendings budget

Now that you know where you’re going and how long for, its time to start on the budget. Yes, its tedious. Yes, it can take a bit of the romance and spontaneity out of travelling. And yes, some people can get away without it. But when you’re planning to travel for 4 months while keeping up with your mortgage repayments and bills back at home, not taking out a personal bank loan, and not using a credit card so you return completely debt free (and you’re not rich), you have to budget.

img_6486
This is a daunting task, and unfortunately the point at which most people give up on their travel dreams. That makes me sad because while it may be a little time consuming, it’s actually not that difficult. There are a lot of different methods people use to budget for travel, be it short or long trips, but this is the method I use.


It’s a two-parter, working out first how much money you’re going to need for your trip, and then how you’ll save it. Today, we’ll start with the first part. I did all of this using Evernote, which I highly recommend – alternatively, open up a new word document to get planning!


*** Before you start reading, please note that I’ve used a quick, three week example rather than my own itinerary, because it’s way too long. I’m also basing this all on a 2 person trip. Adjust as needed.


STEP ONE
The first step is to set out a template that you’ll be able to fill in – there are obviously several ways to do this, but here’s how I set mine up:

*** TRANSPORT ***
FLIGHTS:
01 January : Melbourne – Los Angeles
02 January : Los Angeles – Calgary
08 January : Calgary – Ketchikan
12 January : Ketchikan – New York City

HIRE CAR:
7 days hire Calgary (02 – 08 January)
TRANSPORT TOTAL:


*** ACCOMMODATION & SPENDING ***
LOS ANGELES (01-02 Jan)
– Accommodation:
– Sightseeing:
– Food:
– Other spending:

CALGARY (02-08 Jan)
– Accommodation:
– Sightseeing:
– Food:
– Other spending:

KETCHIKAN (08-12 Jan)
– Accommodation:
– Sightseeing:
– Food:
– Other spending:

NEW YORK CITY (12-20 Jan)
– Accommodation:
– Sightseeing:
– Food:
– Other spending:

ACCOMMODATION TOTAL:
SPENDING TOTAL:


*** INSURANCE & VISAS ***
Insurance:
Visas:

TOTAL:


*** COSTS AT HOME FOR 3 WEEKS ***
Mortgage/rent:
Utilities (gas/water/electricity):
Insurance (home/car/health):
Phone:
Other:

TOTAL:


STEP TWO
Now that you have your template, the hard work begins. With the flights, I’m fortunate enough to be able to do it all myself, given that I’ve worked as a travel consultant for several years and know exactly what I’m looking for. I know this is obviously not going to be as simple for others, so there are two ways to approach this:

1. For the bigger international flights (for example, our big ones will be Melbourne to Los Angeles, New York to London, Rome to Osaka, Bangkok to Melbourne), enlist the help of a travel agent. Shop around until you find one you are comfortable with and trust, because its a mammoth task, and the right partner can make it a hell of a lot easier and fun, rather than stressful.

2. For the “smaller” domestic flights, like Los Angeles to Calgary and Calgary to Ketchikan, get on a website like SkyScanner, Kayak, Webjet etc, and check them out yourself. Flights are generally released 10 months or so in advance, so if your dates aren’t available, just compare a few random dates to get a rough price range.

If you have trains or hire cars, do the same for them, too.

IMG_7478


STEP THREE
Update that part of your template…

*** TRANSPORT ***
FLIGHTS:
01 January : Melbourne – Los Angeles
Emailed travel agent, $950-$1200 one way per person

02 January : Los Angeles – Calgary
Checked SkyScanner, $180-$300 pp

08 January : Calgary – Ketchikan
Checked SkyScanner, $290-$400 pp

12 January : Ketchikan – New York City
Checked SkyScanner, $350-$450 pp

HIRE CAR:
7 days hire Calgary (02 – 08 January)
Auto with aircon through Avis, approx $500
Plus gas

TRANSPORT TOTAL: approx. $4600


STEP FOUR
Research accommodation next. Again, don’t worry too much about the exact dates; you’re just looking for a rough price range. Use sites and apps like Airbnb or Booking.com to compare options, and fill in what you find.


STEP FIVE
Look at any anticipated sightseeing costs, as well as a guesstimate on what you might spend on food and other stuff (shopping, souvenirs, etc). The easiest way to guess at this would be working out how much per day you might spend on food (eg $30 per person per day) multiplied by how many days you’re away for. Again, it doesn’t need to be precise, just a rough estimate.

*** ACCOMMODATION & SPENDING *** for 2 people
LOS ANGELES (01-02 Jan)
– Accommodation: $150 (at airport)
– Sightseeing: –
– Food: $50
– Other spending: –

CALGARY (02-08 Jan)
– Accommodation: $800 (2 nights Calgary, 5 nights Banff)
– Sightseeing: $150 national parks pass
– Food: $200
– Other spending: $200

KETCHIKAN (08-12 Jan)
– Accommodation: $500
– Sightseeing: –
– Food: $250
– Other spending: $300

NEW YORK CITY (12-20 Jan)
– Accommodation: $1400
– Sightseeing: $40pp 7 day metro pass
$35pp Top of the Rock tickets
– Food: $500
– Other spending: $600

ACCOMMODATION TOTAL: $2850
SPENDING TOTAL: $2400

IMG_2093


STEP SIX
Factor in travel insurance! Get a few quotes, compare what they all cover you for, and add that in. Also, costs for any visas.

*** INSURANCE & VISAS ***
Insurance: $400
Visas: N/A

TOTAL: $400


STEP SEVEN
Lastly, some of you may still need to factor in costs at home. For my quick three week example, not so relevant, but absolutely necessary for our 4 month trip! It’s probably a safe assumption that most of us do the internet banking thing these days, so just check your last few debits, and add anything else that is applicable.

*** COSTS AT HOME FOR 3 WEEKS ***
Mortgage/rent: $1200
Utilities (gas/water/electricity): $250
Insurance (home/car/health): $250
Phone: $80pp
Other: –

TOTAL: $1700


STEP EIGHT
Now that you have all that information, put it all together in summary form:

TRANSPORT: $4,600
ACCOMMODATION: $2,850
SPENDING: $2,400
INSURANCE: $400
COSTS AT HOME: $1,700
TOTAL FOR TRIP: $11,950


IMG_7112

Hold onto all of that now, because you’ll need it for the next step of creating your savings budget.

10 ways to travel without breaking the bank (part 2) – saving money while you’re actually on the road!

* Disclosure: This post was sponsored by Cover-More. The opinions contained herein are completely my own based on my extensive and independent experience with the company, of which they were unaware when I was approached to write this. *

jc

A few months ago I wrote an article for Globelle Travels on how to take your dream trip without breaking the bank, which looked at the things you can do in the months leading up to your trip to travel on a budget without having to compromise too much. But I didn’t really touch on what happens when you’re actually there, when you’ve paid off the flights and accommodation, and bought your snow jackets and guide books, and you’ve actually arrived at your destination, still on a bit of a budget. It’s time to take a look at that part.

As stated above, yes this is a sponsored post, and if you’ve been following my adventures for a while, you’ll notice these posts are few and far between; I won’t ever write about anything I don’t actually believe in just for compensation. But I was really happy to take this opportunity when it came along because Cover-More is a company that I’ve actually had a lot of first-hand experience with, and it’s all honestly been great! So on that note, let me now run you through 10 golden rules I try to stick with while I’m actually on the road in order to see and do it all without having to re-mortgage the house in the process…

1. Travel insurance – duh! And not just because of the Cover-More collaboration! For those of you who have been travelling for a little while, you know that sometimes, no matter how prepared you are, things just go wrong. Like that time I was meant to fly from San Francisco to Las Vegas and the airline cancelled our flight two hours before we were meant to fly, and we had to find a new flight, extra accommodation in SFO, lose a night of accommodation in Vegas, organise new airport transfers, and we missed our helicopter Grand Canyon tour (our one big spending extravagance as our Christmas present to ourselves). Anyway, because I like to prepare for the worst, insurance had been purchased with Cover-More at the time we booked our flights so we just submitted our claim when we got home, money was recovered for us and put towards our next trip! Number one rule for travelling on a budget: INSURANCE!!! It would have been really hard for us to keep travelling on the cheap if we’d completely lost all of that money! And why Cover-More? For us, we keep choosing them because they’ve been around for so long and have established a pretty good reputation for offering good cover for a great price – we didn’t want to lose out on decent coverage because of cost, and keep finding that Cover-More fits that option for us.


2. Extra accommodation expenses – not the accommodation itself, the extras. Buy a small travel clothes line and a big bar of laundry soap so you can wash your clothes in your sink or bathtub and hang them up to dry while you’re out during the day. Instead of consuming from the mini bar, buy your own drinks and snacks from a supermarket. And if the WiFi isn’t free, wait until you’re at a café that does offer free access and use that instead.


3. Staying in touch – I’ve disabled international roaming on my phone and I turn off cellular data when I travel. When I want to contact someone, I connect to free WiFi and call using WhatsApp, or text using iMessage. Taking advantage of free WiFi to contact home while I’m gone means I don’t have a phone bill to come home to – happy days!


4. Breakfast – if it’s not included in your hotel room rate, don’t pay extra for it! Breakfast is such an overpriced meal, with cafes easily charging $10+ for a simple bowl of muesli with yoghurt. What I tend to do when I’m travelling is visit a supermarket/convenience store and buy a box of muesli or cereal, a bit of fruit, and some milk or yoghurt to take back to my hotel; it makes a lot more sense to spend $10 on a box of cereal and some fruit that you can stretch out over 4 or 5 days than spending the same amount every morning for the same thing!


5. Hot drinks – this may not be as applicable to everyone, but for anyone like me who is a big tea or even coffee drinker, one of the best investments I made was my KeepCup! Instead of paying $4 each time we wanted a hot drink while we were travelling around wintery America over December and January, husband and I just made our own in our hotel rooms (we found that most, if not all accommodation will offer tea and coffee making facilities, I also packed a few tea bags just in case, and we used some of that milk we’d bought for breakfasts) and hit the road! Saved a ton of money!


6. Food – so important… I’ve always found that the best food is generally street or market food to be honest! When you have the option to do the street food thing, you’re not only going to save money, but you’re also going to be most likely eating freshly prepared food (high product turnover with lots of locals eating it, too), authentic food (ie not Westernised and served with French fries), and actually experience the place you’re travelling through properly! Nice restaurants certainly have their place, but don’t get caught up thinking that you can’t have just as nice a time in Paris lunching under the Eiffel Tower with a ham and cheese baguette that you’ve made yourself from grocery store ingredients for a quarter of the price of the ones you saw in the café window!IMG_0666


7. Cash – this one can seem tricky but doesn’t have to be. If you plan on using your card to withdraw money from ATMs overseas, try to take out bigger amounts at a time to avoid multiple fees (and don’t carry it all around with you – use your hotel’s safety deposit box, or keep it in several places). To combat the fees/carrying too much cash issue, I’ve got myself a Multicurrency Cash Passport, which I’ve been travelling with for years – it’s basically like a debit card that adapts to which ever country you’re in which means low, if any, withdrawal fees. Also super easy to top up while you’re on the road if you want to add more currency. Definitely worth checking out.


8. Getting around – generally taxis are a waste of money. If you have the option, use public transport instead, and if possible, walk!!! You will see SO much more of the city and make so many more amazing discoveries on your own two feet than from inside a train or car!


9. Travel blogs/social media – this is a bit of a random one, but following travel blogs and social media feeds/tags (Instagram particularly) of the places you’re visiting can give you some really great ideas; my sister and I discovered super cheap Bale Well in Hoi An from checking the hashtag #hoian on Instagram before heading out one night, and the $5 feast we got, as well as the adventure and new friends was something we’d never have experienced otherwise, nor was it an experience we could have gotten from an expensive restaurant dinner! You’ll also find that travel bloggers who stumble across hotels, restaurants, tours etc that are well priced and offer good value will usually share them!


10. Souvenirs – one of the biggest money wasters for travellers. I’ve got a new system; if you’ve seen the image below on my blog (which reminds me, it’s a little old and has many new additions since being taken!), you’ve just about seen the extent of my souvenirs, for the most part. I buy something small from most cities I visit, representative of them (the sugar skull from Isla Mujeres, the wooden elephant from Phuket, the carnivale mask from Venice, etc) and keep them on that little table. I also frame a photograph from each city I visit to add to the wall. And finally, I put the hundreds of photos I take each time I travel into photo books so that I can look back over them whenever I want. The memories I have from looking at my own photographs are far better souvenirs and mementos than any tacky plastic touristy object I could have wasted my money on!

IMG_3166

So, there you go – my best tried and tested tips for travelling on a budget. I really hope at least some of them can help others see travel as being a bit more affordable and accessible, and if anyone has any further tips to add to the list, please share; the more help we can offer each other, the more of a chance we all have to see the world!

How To Take Your Dream Trip Without Breaking The Bank!


globelle

I’m super super excited to spread the word that the Globelle Travels website has just been launched! I had the absolute pleasure of catching up with founder Deb a few weeks ago, and it was so amazing to meet another young woman with dreams to see the world, and with such a huge passion for helping open the door for other women wanting to do the same thing, which is what Globelle Travels is all about –

 The idea for Globelle Travels was the result of one solo female traveller receiving a fair few messages from friends and acquaintances asking about her experiences. These questions ranged from how she found travelling alone, to how she went about getting a job and place to live in a foreign country, to how she went about sorting out visas, to whether she felt safe when on the road. The sort of questions any first time traveller might have I guess. Over time, the volume of these messages increased and she realized that there wasn’t any one resource out there that potential female travellers could turn to.

From this, she felt there was a real need for a compilation of information from a variety of knowledgeable sources, which if you were a first time female traveller would make the prospect of exploring less daunting.

The website and concept as a whole will be growing and evolving for some time, so if you’re a women taking on the world, you can connect with Globelle Travels via website, Facebook and/or Instagram!


In the mean time, I’ve also had the opportunity to team up with Globelle Travels and write an article to help kick off the HOW TO department:

This is not the be all and end all list of money saving tips for travel; this is just my personal game plan. These are pieces of advice I’ve gathered from years of travelling myself, from working in accounts roles, and from people I’ve met through my work as a travel consultant. I do practice what I preach, and these are steps I follow every time I travel.

It’s hard to pay off bills, a mortgage and travel the world at the same time which can put a lot of people off following their travel dreams. But it IS do-able, and my aim here is to help other people see that they don’t have to sacrifice their dreams for their finances!


12 months (or more) out: Work out how much the trip is going to cost and making a savings plan.

· You only need a rough estimate to start off with, which you can get by doing a little research online. Say you’re looking at going to New York for 2 weeks over Christmas next year; use a website like TripAdvisor or Expedia to look up how much it’d cost for you to fly to New York and back this Christmas. Look at how much accommodation and travel insurance will cost. Add in the costs of any big tourist excursions, like a Top of the Rock pass. Guestimate how much you’ll be spending per day on food, drinks, shopping, etc. Add it all up, and divide that by the number of months you’ve got left until you want to take this trip. That’s roughly how much you’re gonna need.

· Next, create a savings plan by prioritising what your pay cheque goes towards. Write down how much you get paid each month, then list your non-negotiable expenses (rent/mortgage, bills, grocery money, petrol or public transport money, phone bill, insurance, gym membership, etc). Work out what you’ve got left each month after you’ve paid the non-negotiables, and from there you can work out how much of that you’re willing to put away to fund your travel. It might mean you have to miss a few cocktail nights with the girls or say goodbye to the monthly manicure, but think about how much it’ll be worth the sacrifice when you’re drinking a cocktail at a New York rooftop bar instead!

· Now is a good time to buy yourself a money tin, into which you should dump all the coins you have at the end of the day. Trust me, you won’t miss the collection of 20 cent coins tomorrow, but in a year, they’ll have added up to serious spending money! It’s also worth looking into opening a separate savings account with your bank for the money you decided to put away in the step above. This is something I’ve been doing for years now (along with the money tin), and it’s made the world of difference. Every time my pay cheque comes through, I immediately put my set amount into my travel savings account, and I don’t touch it until I need it to book flights, accommodation, etc. Look into an account that will generate interest as well, so that you’re earning a little more money just by saving – your bank should be able to help you choose the right account for your needs.

· Start doing a little bit of research now on where you want to go. Work out roughly where you want to go and how long for. It may be as simple as 2 weeks in New York, or it may be 3 days in London, a week in Rome, 4 days in Florence and then a week in Paris to finish up.


8 – 10 months out: Get ready to book your flights and travel insurance.

· Now is when you’ll see why it’s important to have a bit of a plan together. Sure, you can wing it and book your flights a month or two out, but that’s not going to save you money! Flights are generally released for purchase 8 – 10 months prior to your travel date. Remember if you’re taking a longer trip, this will mean 8 – 10 months prior to your return date, too. If you’re travelling in peak times like school holidays, Easter, Christmas, New Years, be prepared to book 8 months in advance – sure, you can get some great sale fares closer to the date, but not if you’re travelling at these times. If you want some professional advice, don’t be scared to speak to a travel agent – remember, you’re not obliged to book anything with them, but if you do click with them and trust them, they can be your best ally in booking your trip.

· It’s a cliché, but it’s true: if you can’t afford travel insurance, you can’t afford to travel. Having worked as a retail travel agent for a few years, I’ve seen and heard all the horror stories and ridiculous amounts of money people have had to pay for injuries, thefts and the like overseas, because they didn’t think $100 for travel insurance was a good way to spend their money. Take out travel insurance the same day you purchase your flights; I speak from personal experience when I say it’s a non-negotiable.

· If you’re not 100% set on travel plans, just aim to get your international flight booked first, and worry about your internal travel later. Remember that you’re not just restricted to flights – trains can often be a great and less expensive alternative if you’re not travelling too far. They can also be a great time saver, as you’ll be skipping the airport security checks, waiting for luggage, etc.

· If you decide to book internal flights early as well, check their luggage policies – a lot of internal North American flights (ie. Flying American Airlines from LA to New York) won’t include luggage, and you’ll be paying around USD$25 per suitcase you take, so add that into your budget if need be. If you decide to book through a travel agent, ask them about booking all of your flights together and if that would be a more financially viable option than booking them all separately.

· Now is also a good time to start looking at foreign currency. Exchange rates can fluctuate so much, so if you do have a little spare cash and notice a particularly good exchange rate, change a little cash. Also consider options like a Cash Passport card to use overseas – I swear by mine!
7 months out: Consider seasonal clothing.

· I know this may seem overly organised, but this can save a ton of money. I visited North America and Canada over Christmas/January 2015, which is obviously a pretty cold time of year over there! Six months out from our trip was winter here in Australia, which meant two things:
1. It was almost end of season sales here, which meant I was going to be able to get some cheap winter gear in stores around August; I got a great pair of leather boots for half price (there’s no way I could have afforded them full price!), and I wore them almost every day. Great investment!
2. It was also early summer in Europe/America, so their winter gear was pretty cheap, too. I shopped online, getting a good water proof puffer jacket online (ASOS, I believe) on a 70% off sale, which again was worn most days and was another great investment.

It may seem a bit crazy, but trust me, it’ll save a ton of money. Especially if you are travelling in extreme weather – winter coats in New York cost a small fortune, as did sunscreen in Mexico! Stock up on out of season stuff while you can if you know you’re going to need it.


6 months out: Planning it out.

· I know it’s really common and easy to turn to guide books when you’re planning a trip – I’m guilty of this too, don’t worry! But more and more I’ve found myself turning to one of the greatest untapped resources when it comes to travel planning: travel bloggers! It wasn’t until I started blogging that I realised how much incredible information there is out there, and it’s so easily accessible! Why pay for travel books that are often not up to date, when you have a world full of people writing all about their travels from last month, last week, yesterday?! Sure, the glossy, shiny, professional photos are pretty, but I’d rather see what places are like first hand, photographed by real people. I’d like to hear about the entry prices, opening hours, what to expect, what to be wary of from someone like me who just visited a few days ago. And all of this information is FREE! Just Google “travel blogs” and you’ll have a few million to choose from!

· While you’re at it, download a solid travel app – personally, I like Tripomatic. It’s easy to use, has some good suggestions of things to do, allows you to enter your own places to visit, and most importantly, offers an offline map functionality on which you can plot all the places you want to visit on. So even if you’re out of a free wifi zone, you can still get a map up of New Orleans that’ll show you the way from Café du Monde to the Voodoo Museum! You want a great money saving tip? Don’t walk around foreign cities with a paper map! You may as well paint a target on your back! I know it’s horrible to be so pessimistic, but reality is that tourists are easy targets for theft. You don’t want to find yourself in the horrible situation of going to pay for your coffee and croissant in Paris only to realise that your wallet is gone. I really liked and heavily relied on the offline maps in North America, particularly in big cities like New York and Chicago. I just looked like another person checking Instagram while they were walking along, when in reality I had a map of the city up and was following the little blue dot from point A to point B. Amazing!

· Check if any of the places you’re going to need a visa – if they do, now is the time to start looking into how far in advance they need to be organised and setting aside the money for them. Some places offer visa on arrival – while it may be cheaper at face value, it won’t be if you turn up and are for some reason not eligible for the visa on arrival. Very expensive trip from one airport to another and then being sent back home again. Ditto for your passport – make sure it has at least 6 months expiry from the end date of your trip, or you may be denied boarding. Seriously, I’ve seen it happen while working as a travel consultant. VERY expensive mistake to try to fix!

· While you’re checking these things out, check to see if you need vaccinations. Again, annoying to fork out the money if you do, worse and much more expensive if you contract hepatitis while you’re enjoying a stay in Koh Samui.

· One final thing to consider 6 months out is making sure you have enough money to come home to. There’s not much worse than having planned in advance to have enough money for your trip, but then coming home and realising your bank account is empty and rent is due next week. Make sure you’ve planned to have a little money set aside for when you return.


While you’re away: spend smart.

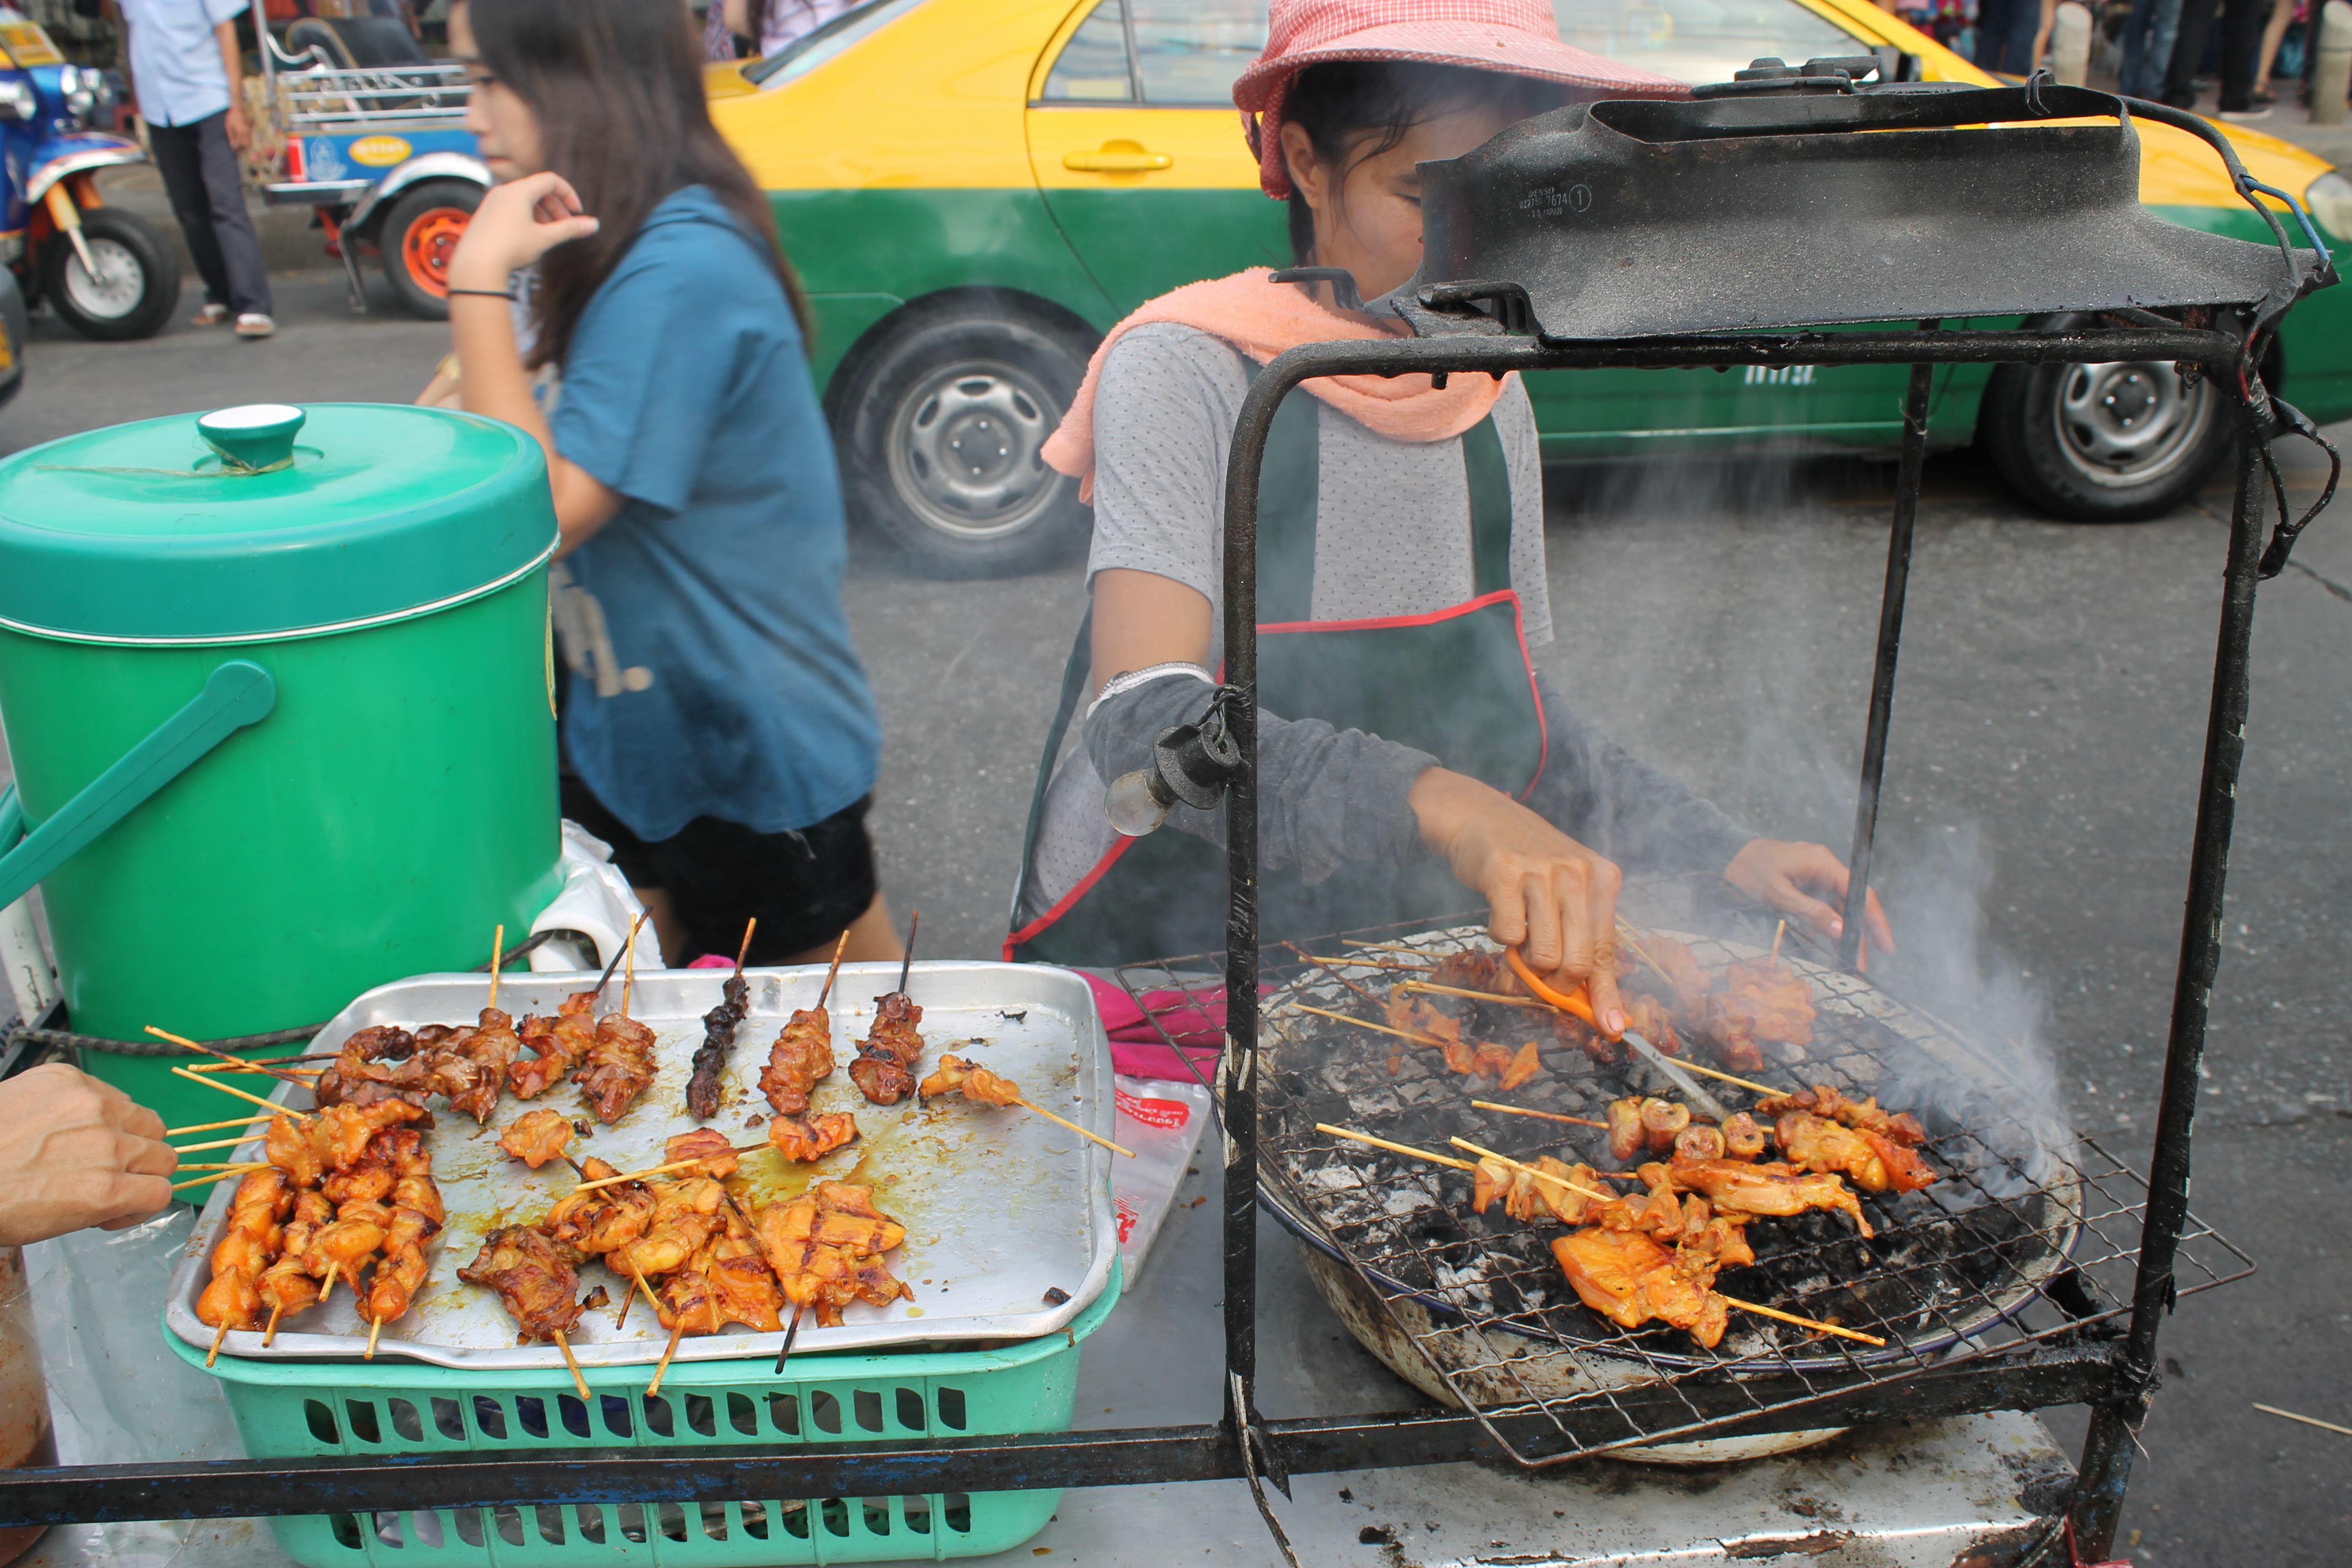
· It’s hard when you want to do everything and buy it all and see it all and eat it all! Hopefully if you’ve planned and budgeted carefully enough, you’ll have enough money to get you through and allow some extravagances. If not, consider street food over fancy restaurants, discounted tickets instead of “the works” deals, saying no to the gorgeous Italian leather shoes in the window so you can see the Colosseum instead. At the end of the day, you know what you can and can’t afford, so spend smart and try not to miss out on anything you’ll regret when you get home!

As I mentioned earlier, this is by no means an exhaustive list, so please keep the conversation going and add more tips!