Stay here: The Bubble Hotel, Iceland

The Buubble, Iceland
http://www.buubble.com/

My husband was flicking through a travel magazine on a flight we took in early 2016. He came across a picture of what appeared to be a giant bubble, and a few lines describing it as newly built ‘bubble accommodation’ somewhere in the middle of Iceland…

I started Googling when the plane landed, and found it to be Buubble, the self-proclaimed 5 million star hotel. Basically, a “hotel room” that’s one giant, clear, bubble, where you can rest your head and enjoy a non-stop 360 degree view of the Icelandic night sky, and hopefully catch a glimpse of the Northern Lights. “I’m concentrating on offering the accommodation during the wintertime, so that people can see the Northern Lights and the starry sky,” Róbertsson explained on the website not long after it launched. That sounded pretty good to me.

My birthday happened to fall in the middle of our Icelandic stay, and I decided that if I had to be another year older, I wanted to stay in one of these bubbles for my birthday. I braced myself for what I was sure would be a ridiculous price, and was more than pleasantly surprised to find out it was going to set us back AUD$300 for the one night.


WHAT’S IT LIKE IN THE BUBBLE?
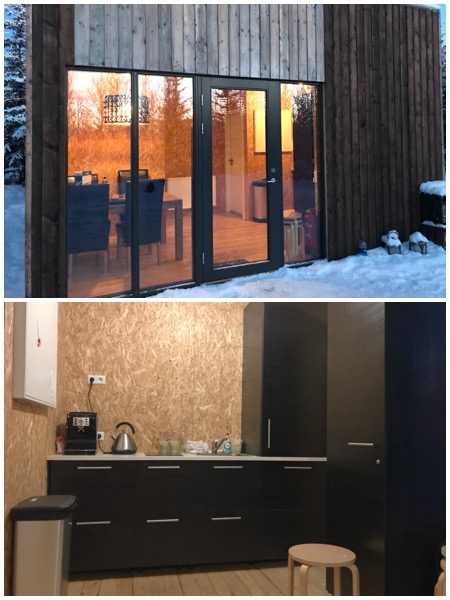
Despite the fact that they are a self-proclaimed 5 million star hotel, given that the ‘hotel’ is actually a giant bubble in the middle of a forest (the exact address and location is not revealed until you’ve booked, for safety and privacy reasons), don’t expect 5 star facilities. The bubbles themselves (there were only 2 when we booked ours, but it’s now grown to 8) just contain a big, comfy bed, a little coffee table, a lamp, and a power point (yes, devices can be charged, no there isn’t WiFi in the bubbles, but there is WiFi available in the communal service house). There was no TV or sound system, and no lights – just a small lamp for dim light; you won’t need it, because once it gets dark (sunset is around 4 – 4:30pm in November) and the stars come out, you won’t be able to look away.

HOW DO I STAY WARM?
How on earth are you going to keep warm in the middle of winter inside one of these guys? As the website will tell you, “The bubble structure is kept inflated by a slight over-pressure from a noiseless ventilation system. It permanently renews the air inside 2-7 times the volume per hour and this way it prevents humidity. The system has heating elements with thermostat so the bubble stays warm all winter.” That system, combined with an extra little plug in heater, kept us pretty cosy despire the snow and frost outside. Oh, and electric blankets. That said, a middle of the night toilet run isn’t real fun…


WHERE’S THE BATHROOM?!
In terms of facilities, there is a shared service house tucked away on the property, containing showers and toilets (toilet paper and shower towels are provided) – they’re centrally located, so only a 2 – 3 minute walk from any of the bubbles. But when it’s below freezing and you need to pee in the middle of the night, it’s hard work getting your layers and snow boots on!

ARE THERE ANY OTHER AMENITIES? WHERE CAN I EAT?
There is free car parking available, and the service house has a small kitchen space with a dining table, coffee machine and elecrtric kettle, sink, microwave, dishwasher, and even a small stovetop – as well as pots, pans, cutlery and crockery! Once you get there, you’re probably not going to want to venture back out to look for a restaurant because a) driving at night in Iceland is scary when the weather can change at the drop of a hat, and b) Iceland is expensive beyond what you’d expect (as in a margherita pizza and a vegetable salad cost us AUD $55.00. Yup, seriously). Your best option is to stop at a supermarket like Bónus or Krónan, and BYO dinner – we took a cup of instant noodles each and bought 2 capsicums – we chopped them up and cooked them in a fry pan in the share kitchen, then stirred our noodles through. And a bag of M&Ms for dessert

UMMM… PRIVACY?!?
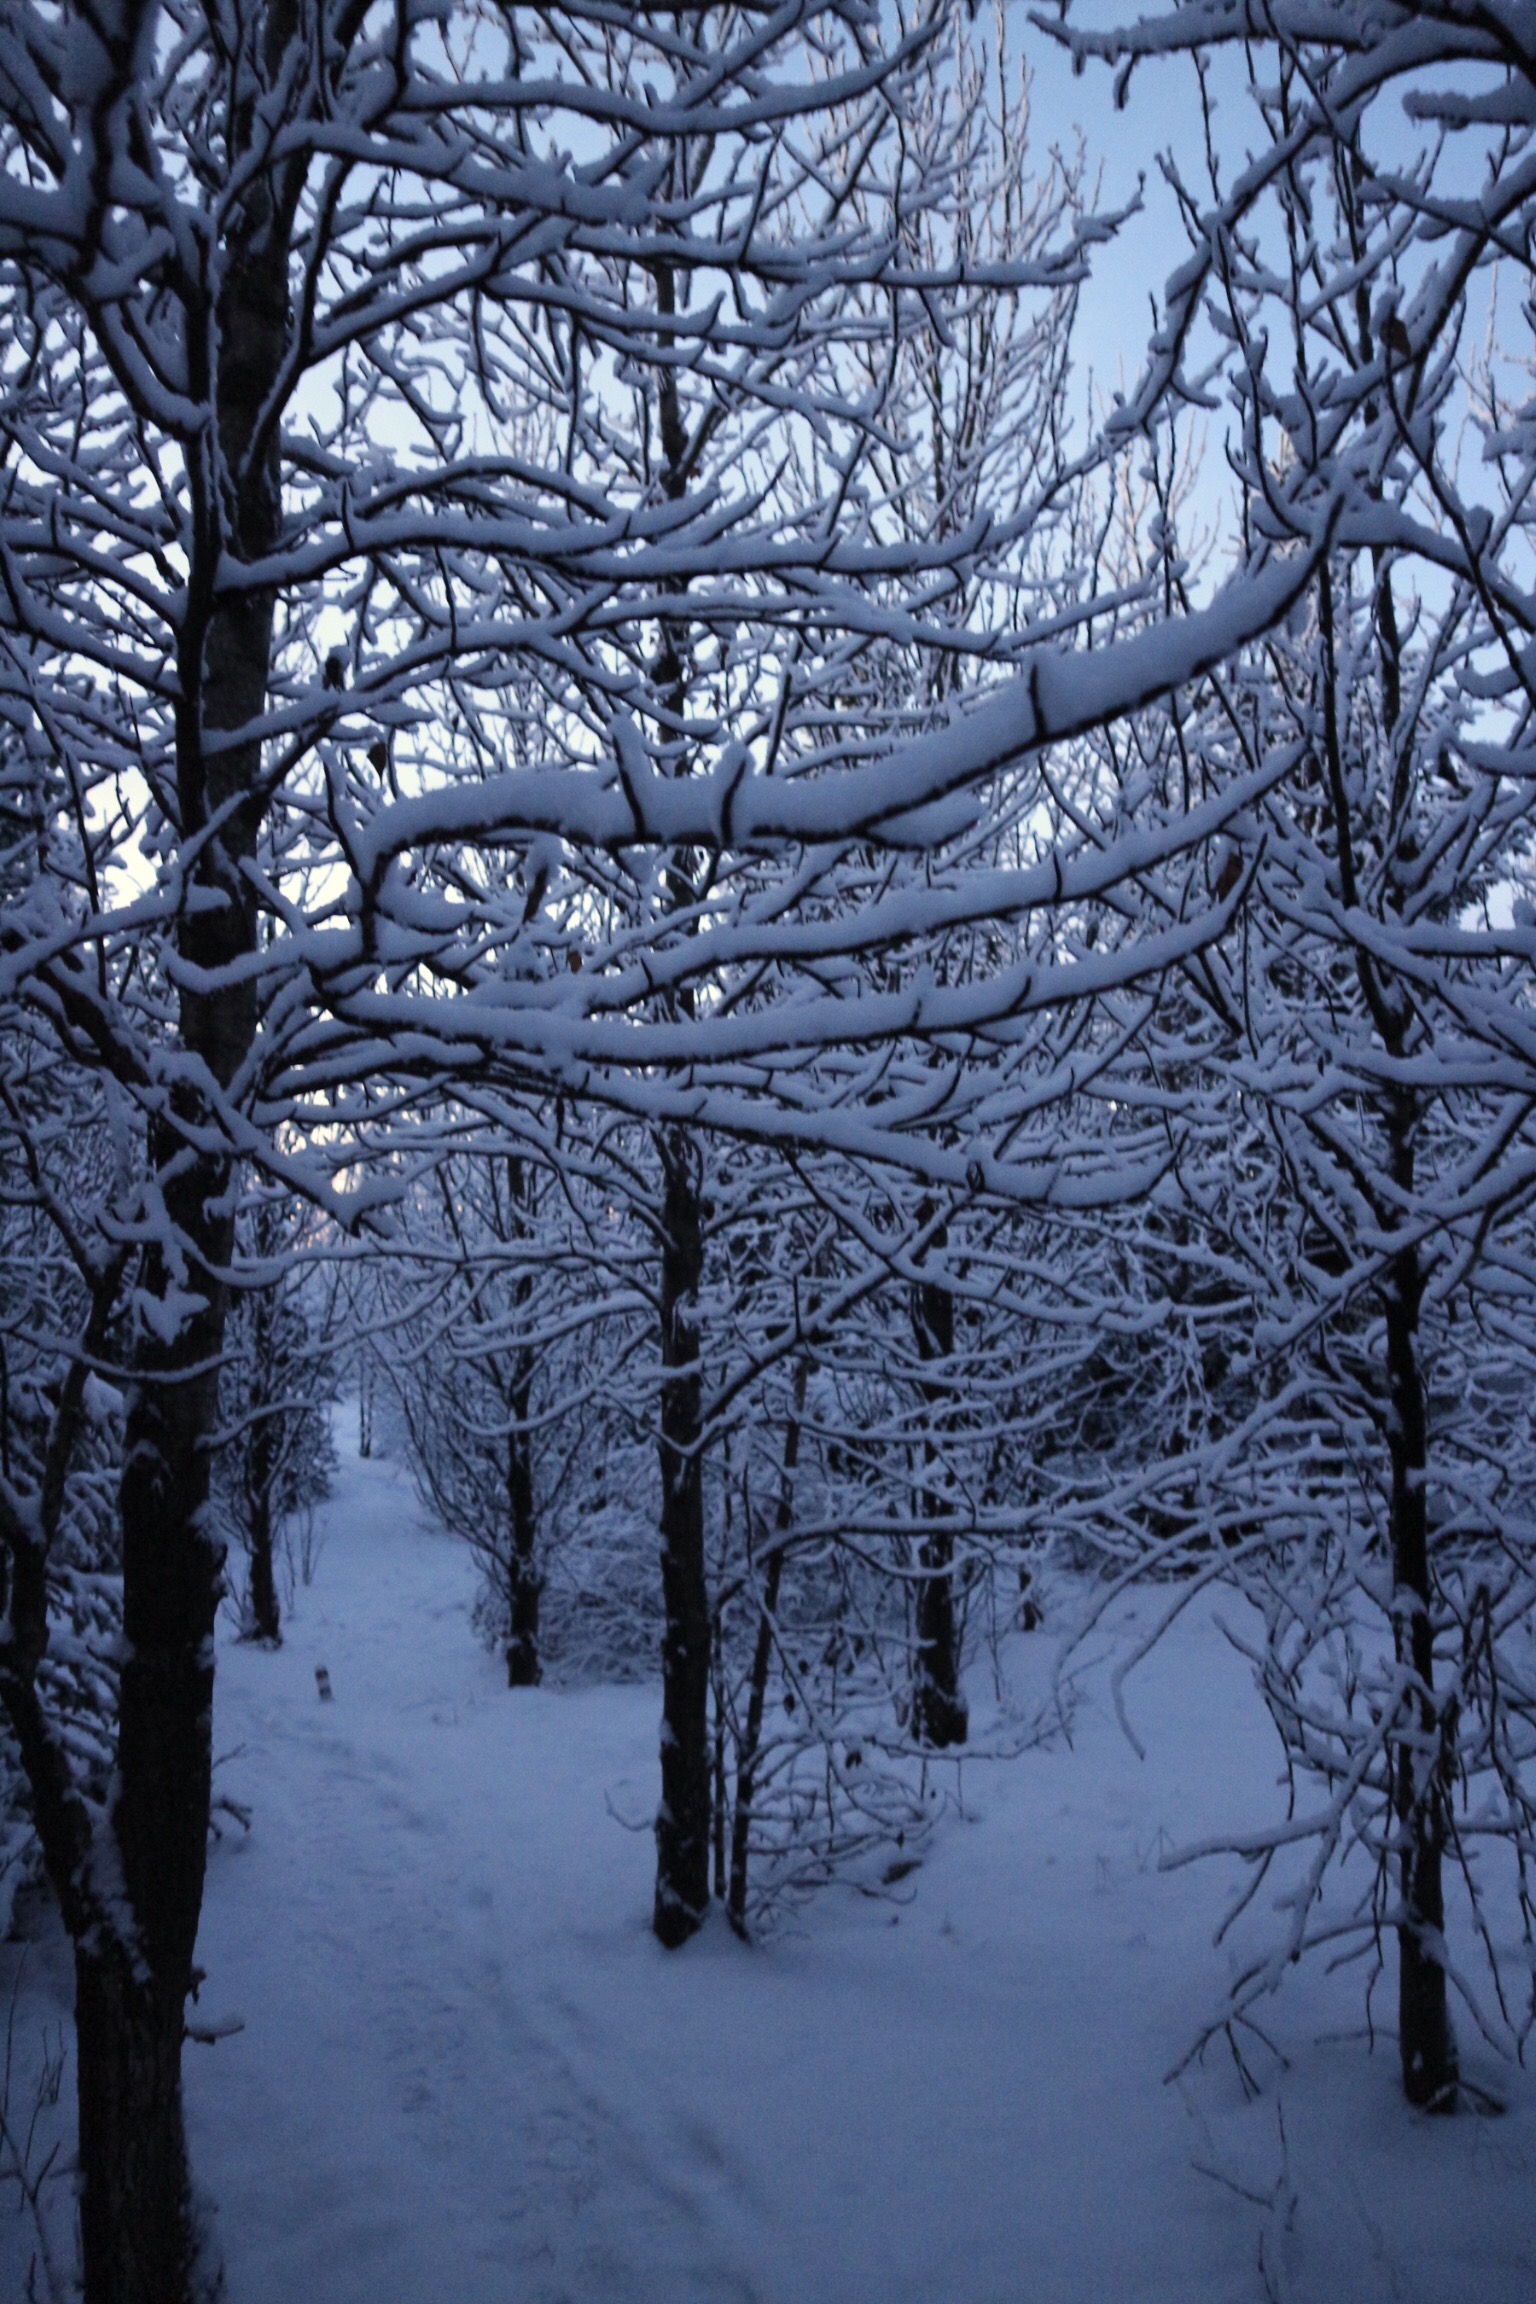
This was one of my concerns, given that there are actually several bubbles on site. Above is a photo of the path we walked from our bubble to the share service house, and if you scroll back up, you’ll see the thicket of trees behind the bed. Yes, there are other bubbles around, but at best you’ll only see a peep of them through the trees if their lamps are on. When we visited, there were only 2 bubbles occupied by independent travellers (us and another couple), and a few more occupied by tour participants, and we didn’t see or hear any of them except for a brief crossing of paths making dinner. And, there are no animals other than the odd bird.


WORTH IT?
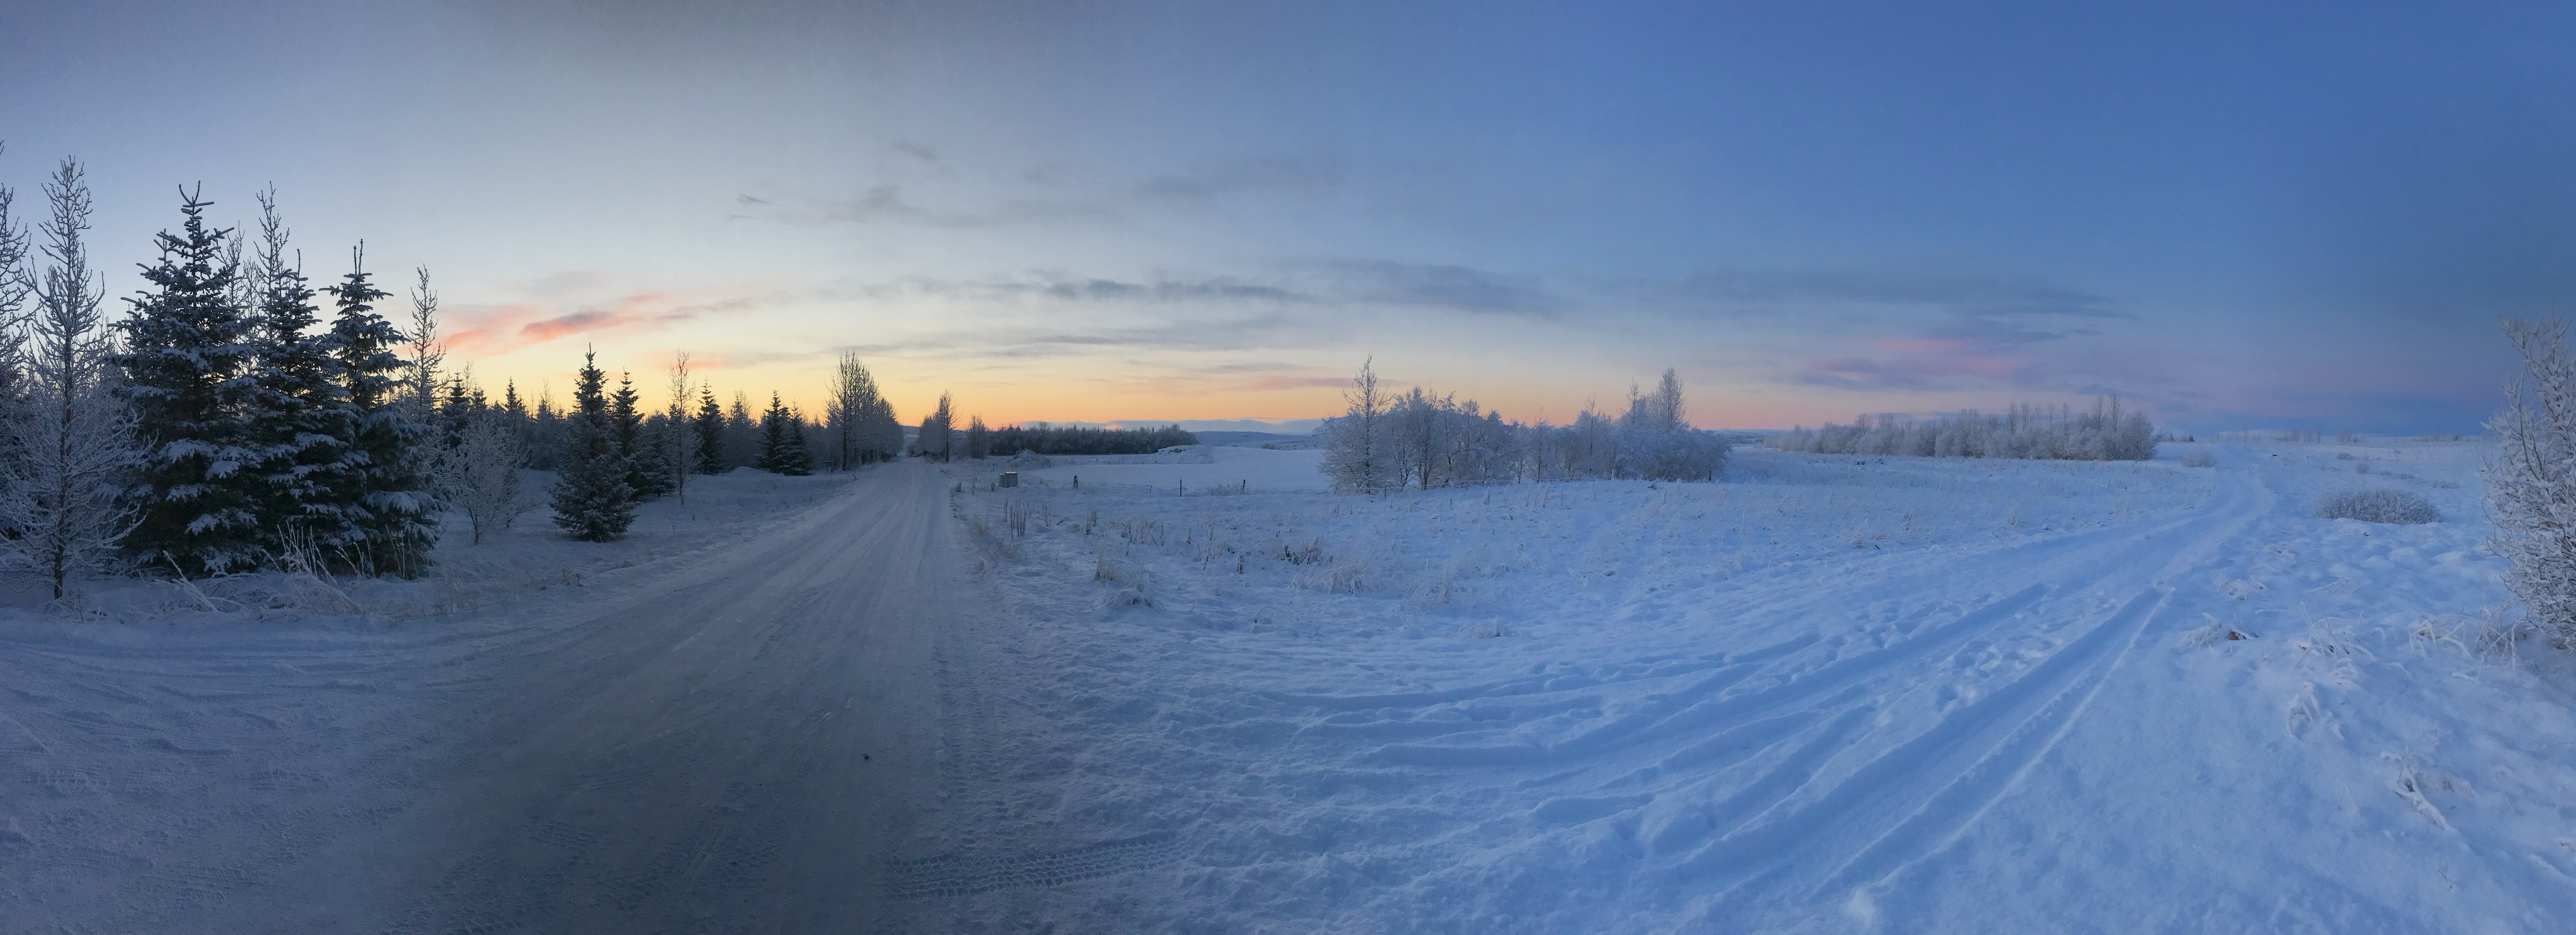
Absolutely!!! While we didn’t see the Northern Lights, we saw the stars like we’ve never seen them before. We lay on the bed and watched a snow flurry slowly dust the dome. We woke up to a winter wonderland you couldn’t even conjure up in your dreams (see below – the snow genuinely sparkled in the morning sun). It was one of those experiences that, although it cost money, I couldn’t put a price on, and I’ll remember forever.


And head on over to their website for answers to more of your questions and to book your bubble. You know you want to.

6 Stops To Make On The Tioga Pass Road in Yosemite National Park

Yosemite is a beautiful park, and the big drawcard sights are every bit as impressive as you think they’ll be. The Half Dome and El Capitan are imposingly gorgeous, and the little museum and cemetery are well worth the look, too, and I’ll certainly get to those.

But everyone goes to the Yosemite Valley to see those, so after a day there, we thought we’d take the path less travelled and drive the Tioga Pass Road and see what the other side of the park had to offer.

With a bit of help from my beloved Sygic Travel app, I plotted a path from our accommodation at the Yosemite Westgate Lodge to the Tuolumne Meadows, and saved the spots we liked as we went… here’s the map we ended up with (not quite to scale, but the approximate distances between each stop are marked in there!):

It’s a delightful drive, and so easy to do by yourself. We did this drive, with all our stops, in about 5 hours – if you’re a hiker, though, you might want to leave more time.


Stop 1: Buy your pass
This was the entrance closest to our accommodation, so if you’re planning to stay in the same spot, just roll on up, pay your USD$30 for a week’s visit, take your pass, and roll on through! Keep your receipt, because you’ll need to show it again on your way out.


Stop 2: The sheer rocks
This really took us by surprise; we pulled over so I could take a photo, and ended up scrambling up the rocks a way, just because we could. Fantastic view, several squirrels, and just fun to be crawling around out there! Be careful pulling over because as there isn’t a carpark, just a little space on the side of the road.


Stop 3: The little lake
I don’t know what it’s called, but this little lake just comes out of nowhere, and there was no one else around so we had it all to ourselves. There’s a little inlet to pull your car in, then take the faint path leading down to the water.

Top left: the sheer rocks  —  Bottom left: Olmsted Point  —  Right: the little lake


Stop 4: Olmsted Point
Holy wow this place was incredible! Plenty of space to park your car, and a few trails if you want to hike. Take the path marked about 300m to the viewpoint, and find yourself basically at the top of the world, surrounded by granite and pines.


Stop 5: Tenaya Lake
This place is perfection.. the water is so clear you can see straight to the bottom, and the rocks are high and flat enough to picnic on, which we did. There were a few cars about, but still few enough that we could pick a spot on the water to relax on our own.

Top: Tenaya Lake  —  Bottom: Tuolumne Meadow


Stop 6: Tuolumne Meadow
This was the highest point of our day trip, at an elevation of just over 8500 feet. A big, flat, wide open meadow, with the river running through it. Again, lots of parking available, but such a big area that we didn’t see anyone else around until we were walking back to the car.

Top 10 Things To Do in Hoi An

1. Take in an amazing view and a delicious meal at Hoa Anh Dao Sakura Restaurant
http://www.hoiansakura.com/

Where? 119-121 Nguyễn Thái Học, Minh An, tp. Hội An
Why go? It’s one of the fancier restaurants in town, and it’s well worth it. That said, we ordered 6 dishes (including seafood), 3 beers and a cocktail, and got away for around AUD$60.00, which isn’t exactly going to break the bank, as far as fancy feeds go! And if you remember, ask for a seat in the rooftop courtyard, too – the best view in the city.
How long will you need? We were there for about 2 hours.
Cost? Depends how hungry you are – we spent around AUD$60.00 for a genuine feast


2. Support a good cause by drinking tea and coffee at the Reaching Out Tea House

 http://reachingoutvietnam.com/
Where? 131 Tran Phu Street, Hoi An, Vietnam
Why go? The beautiful space is serene and calm, made even more so by the request that guests communicate in whispers. The staff are all speech and hearing impaired, which makes not the smallest bit of difference in their service. If anything, it’s better than any other tea house I’ve ever visited; they were all so gracious, elegant and accommodating. And the tea and coffee variety is fantastic.
How long will you need? We stayed around an hour, but would have happily stayed longer if our stomachs weren’t grumbling for dinner.
Cost? Varies a lot depending on what you order


3. Up your kitchen game at a Morning Glory cooking class
http://msvy-tastevietnam.com/cooking-classes/
Where? 3 Nguyen Hoang Street, An Hoi Islet, Hoi An
Why go? This is THE premier cooking school in Hoi An, and as far as I’m concerned, an absolute must! There are a few tours on offer, I’ve done the same one twice now (yes, I enjoyed it that much!): the Holiday Masterclass (including a trip to the market and a cooking lesson you’ll never forget).
How long will you need? This class runs from 8.30am – 1.30pm.
Cost? AUD$40.00 per person, which includes your market tour, cooking class, lunch, recipes and a little gift to take home


4. Cycle the islets of Hoi An with Heaven & Earth Bicycle Tours

 http://www.vietnam-bicycle.com/
Where? Meeting point for tours: 57 Ngo Quyen St. – An Hoi Islet, TP Hoi An
Why go? I don’t particularly enjoy bike riding and was talking into this by my sister; it’s one of the most uncomfortable but incredible things I’ve ever done. We got to see parts of this beautiful country we never would have had the opportunity to see otherwise, led by 2 local women who were some of the loveliest people I’ve ever met. It hurt like hell, but I’d do it again in a heart beat!
How long will you need? We took the REAL VIETNAM tour, running approximately 8am – 5pm.
Cost? Around AUD$60.00 per person, including water bottle and lunch


5. Stuff yourself silly with the city’s famous dish, cao lau
Where? All over Hoi An.
Why go? Ohh cao lau, where have you been all my life?! Thick, chewy noodles, the TASTIEST broth known to mankind, delicious slices of pork and fresh herbs/greens, topped with deep fried pieces of noodle. Magic.
How long will you need? Not long, if you eat as fast as I do when faced with something this good.
Cost? A few dollars


6. Walk through the lantern-lit riverside night market

Where? By the riverside, every night.
Why go? If you check out the #hoianlanterns hashtag on Instagram and don’t immediately feel the need to throw yourself into the middle of these perfect balls of light, there may be something wrong with you.
How long will you need? Spend the night walking around by the riverside – not only are there lanterns galore, but it turns into a market place with cheap souvenirs and delicious street food.
Cost? You can bring your own lantern home! The smallest ones cost around AUD$1.00 each – barter though, I ended up with 6 for $5, just because I asked.


7. Take a trip out to My Son Sanctuary

 http://whc.unesco.org/en/list/949
Why go? My Son, dated from the 4th to 13th centuries AD, is the former capital of the Champa Kingdom. Set in stunning green, mountain surrounds in the Quang Nam Province near Hoi An, it houses the remains of the Cham temple towers. They’re incredibly old, insanely beautiful, and well worth taking the time to see.
How long will you need? We took a half day tour organised by a small local travel agent we found in Hoi An.
Cost? Honestly can’t remember, but I know it wasn’t much.


8. Stuff your face with all of the food at Bale Well
Where? 45 Tran Hung Dao Street, Hoi An
Why go? For a mere sum of AUD$6.00 per person, we got a bottle of water each and an all-you-can-stuff-your-face-with pile of fresh herbs and salad, peanut dipping sauce, stir fried veggies, rice paper, freshly fried spring rolls and BBQd meat on sticks. This is some of the best street food you’ll ever find.
How long will you need? Give yourself at least an hour.
Cost? AUD$6.00 per person will have you rolling out.


9. Drink more tea at Cocobana Tea Rooms & Garden
 https://www.facebook.com/Cocobanatearoom/
Where? 16 Nguyen Thai Hoc St, Hoi An
Why go? Walk on in, and once you’ve breathed a sigh of relief at the air conditioning, you’ll be met with a wall of tea. Oh so much tea… oh so exciting! They have literally dozens of options to choose from, hot and cold, as well as a great coffee menu. And the best part? They’re all available to take home.
How long will you need? We spent about an hour there, but I’d happily stay longer – it’s just got that peaceful, homely atmosphere that you won’t want to leave.
Cost? Depends what you buy, but prices (particularly for take home tea) were very reasonable


10. Just admire the perfection that is the colour yellow all around the city

Where? Everywhere you look
Why go? You’ll quickly notice that Hoi An’s theme is yellow. It’s everywhere, it’s warm and beautiful, and it completely defines the city. Everywhere you look, you see another perfect yellow wall, the same shade as the others, and yet somehow completely different.

Top 10 Things To Do in Washington, D.C.

1. Walk through Arlington National Cemetery

 http://www.arlingtoncemetery.mil/
Where? Arlington, Virginia
Why go? To call over 600 acres of tombs an overwhelming experience would be a disrespectful understatement. I wasn’t at all prepared for the enormity of it, or the impact seeing all of those tombs would have on me. It wasn’t easy to walk through, but I felt it was a necessary walk, not just for me but for everyone; in order to continue to justify war and hatred and taking of lives, I think everyone should take a walk through here
How long will you need? We spent around 2 hours here.
Cost? Free


2. Eat and shop your way through the Eastern Market
http://easternmarket-dc.org/

Where? 225 7th St SE, Washington, DC
Why go? The market itself left a lot to be desired on the day we visited, with very few stalls open, but the food section was pumping! Places like Market Lunch were full of people, and sitting at the big communal table with locals and my giant plate of pancakes was a brilliant way to start a day of exploring!
How long will you need? With the market not offering a lot, we were there for about an hour to enjoy some serious breaky and people watching.
Cost? My “short stack” of blueberry buckwheat pancakes with toasted pecans cost around USD$5.00. I use the term “short stack” very loosely, because the serving was so big I couldn’t finish it, even with help.


3. Take time to reflect at the Holocaust Museum

 https://www.ushmm.org/
Where? 100 Raoul Wallenberg Pl SW, Washington, DC
Why go? I’ve had a strong sense of horror, curiosity, intrigue and admiration for the victim’s of Hitler’s war of terror ever since reading Anne Frank’s Diary and Elie Wiesel’s “Night” in high school. The more I read from survivors, the more it digs into my soul, so I felt a strong pull to visit the Holocaust Museum. I moved through in in quiet reverence, took only one photo (above) in order to remember it, and left in silent tears. Again, if we are living in an age where our leaders condemn war, this is something that must be experienced, regardless of how painful that is.
How long will you need? We were in there for around 2 hours.
Cost? Free.


4. Indulge your inner bookworm at the Library of Congress
https://www.loc.gov/

Where? 101 Independence Ave SE, Washington, DC
Why go? This is an experience for both book and architecture lovers. The building will leave you speechless if you take the time to look at the little details, and the collection of books is mind-blowing.
How long will you need? We were there for an hour or so – I could have stayed all day.
Cost? Free! How wonderful is this city of free education?


5. Make yourself at home at Ben’s Chili Bowl
http://benschilibowl.com/

Where? 1213 U St NW, Washington, DC
Why go? The dogs were fantastic, more of a sausage than a frank, absolutely delicious. The chili was great too, a little bit of a kick, heaps of flavour, and plenty of it. What was even better was the gentleman who came over to our table to say hi, welcome to Ben’s, and asked how the meal was; not only did he stay for a chat and a photo, he introduced us to one of the owners and family members of Ben. The food was good, but the people were better!
How long will you need? We weren’t planning to stay long, but ended up there for just under an hour, chatting to our new friends 🙂
Cost? USD$5.95 for the classic jumbo chili dog.


6. Wonder through Georgetown

Why go? After the intensity of the museums and monuments, it’s kinda nice to just get away and take a stroll and look at the beautiful buildings that reside in Georgetown.
How long will you need? We were wondering around for an hour or two.
Cost? Free.


7. Take a quiet timeout at the Reflecting Pool
http://www.nationalmall.org/explore-national-mall/monuments-memorials/lincoln-memorial-reflecting-pool
Where? National Mall
Why go? The day we visited was cold and rainy, and I was getting a bit overwhelmed by it all. By the time we reached the reflecting pool, I needed to pause, and there couldn’t be a more beautiful spot in the city to do that. Watching the ripples across the water and the reflection of the trees above, it was the perfect place to stop and consider how far we’d come by that point in our trip. And when I finally looked up, I found I wasn’t the only one taking a time out.
How long will you need? I took about half an hour (under my umbrella!).
Cost? Free


8. Let your inner dorky child run wild at the National Air & Space Museum

https://airandspace.si.edu/visit
Where? 600 Independence Ave SW, Washington, DC
Why go? I’m actually a bit of an aviation and space nerd, so when husband suggested a stop in at this museum, I was stoked! There is SO much to see in here, and quite a few interactive stations – perfect for when it’s really raining and you need a break. Or for when your kids are starting to drive you up the wall and you to distract them.
How long will you need? At least a few hours.
Cost? Free, again!


9. People watch at Washington Harbor

https://www.thewashingtonharbour.com/
Where? 3000 & 3050 K Street NW, Washington, DC
Why go? This was sunset on the harbor after a long and emotionally taxing afternoon in Arlington. There weren’t many people out, being the middle of winter; a few joggers and dog walkers, and us. We sat down, watched a few planes soar overhead, and let the experiences of the day wash over us.
How long will you need? An hour or two, depending on how much is going on.
Cost? Another freebie.


10. Get into the greatest food combo the city has to offer, fried chicken and donuts
Where? My personal favourites were Astro Doughnuts & Fried Chicken (1308 G Street NW, Washington, DC) and GBD Fried Chicken & Doughnuts (which is sadly now closed).
Why go? Fried dough. Fried chicken. I had no idea it was a thing to throw them together. Astro’s chicken was so tender and juicy on the inside and ridiculously crispy inside, and their doughnuts were some of the best I’ve had.
How long will you need? How fast can you eat?
Cost? Doughnuts cost around USD$3.00 each, and the big 8 piece chicken box will set you back around USD$20.00 (Tip – we didn’t get through the 8 pieces. The services are WAY bigger than those you get in Australia)

Logistics of travel – part 7: Packing!

Well, this takes us to the end of the series! I hope you’ve enjoyed the posts a g gotten something out of them. If these posts help even one person get out there and plan the trip they’ve always dreamed of but never thought they could make a reality, I’ll be stoked!

I couldn’t finish this series up without addressing one of the most commonly Googled travel topics: what to pack. And this is a really tough topic to write about because, despite what all of those articles and posts out there may say, there really is no “one size fits all” method to approach it. So instead of telling you what you MUST and MUST NOT pack, I’ll run through a few tips I’ve picked up over the years that have helped me, and that I’ll be using to help me pack for this upcoming trip.


THE CHECKED LUGGAGE:
– If you don’t wear it at home, you won’t wear it while you’re away. This is one of the most important “rules” I stick to when I pack. When you’re travelling, you want to be comfortable. So while that tight little high waisted skirt might look cute on your social media accounts, are you really going to be comfy after 5 hours walking through Rome in it?

– Stick to neutral colours for your base wardrobe, and use accessories to get some colour in. For me, I stick with clothes in black, white and denim. Then, its easy to add in a bright purple beanie, a sunshine yellow scarf, an emerald green wrap, cobalt blue gloves, etc. Much easier and makes for a much lighter bag!

– Consider the weather and pack appropriately. In the cold, layers are your friends rather than several big, bulky coats. And get yourself some thermal tops and bottoms – they’ll make all the difference.

– Socks and undies – you won’t need a pair per day. Just pack a good bar of laundry soap, and you can wash them in your hotel sink and hang them up on a shower rail or towel rack to dry.

– Let’s talk shoes…. you don’t need as many pairs as you think you do, I promise. I’ll be taking a four month trip around the world with only 4 pairs of shoes – BOGS water-proof and lined snow-friendly boots, brown leather lace up boots, a pair of ballet flats and a pair of black runners. I’ve learnt my lesson about over-packing shoes now.

– On that, remember to pack a pair of thongs/flip-flops. I always wear them to shower in.

– If you’re travelling with a companion, it’s not a bad idea to split your clothing between both suitcases. That way, just in case one gets lost in transit, you’ll at least have a few items of clothing to get by with until the other case arrives.

– Little things that are always helpful to have packed: zip lock bags, a spare phone charger, a microfiber towel, a travel clothesline and a bar of laundry soap, power adaptors, dryer sheets (pop a few in your suitcase to keep things smelling a bit fresher), a waterproof wash bag for dirty laundry until you can wash it, and a few little mementoes from home (we like to carry little MELBOURNE or AUSTRALIA magnets to leave as gifts when we’ve been treated especially well by our Airbnb or hotel hosts).


THE CARRY-ON BAG FOR FLIGHTS:
This is going to be very different depending on what your travel style is, but here are my essentials:

– Travel document wallet
– Actual wallet with cash and cards
– Book to read
– Journal and pens
– iPod & noise-cancelling headphones
– Phone/iPod charger
– Camera
– Hand cream, lip balm, small perfume bottle & make up wipes (all in a small, clear bag so I can get through security)
– Healthy snacks
– Pain killers (I’m prone to migraines)
– Spare t-shirt, leggings and undies (you never know if you’ll be delayed)

Plus I always grab a random magazine, a bottle of water & small bag of peanut M&Ms at the airport on my way to the gate. Have been doing it for years, can’t not do it anymore!


Well, that’s it from me, but every traveller has their own advice, so please add your tips in the comments section and help us all out!